 Save to Pinterest
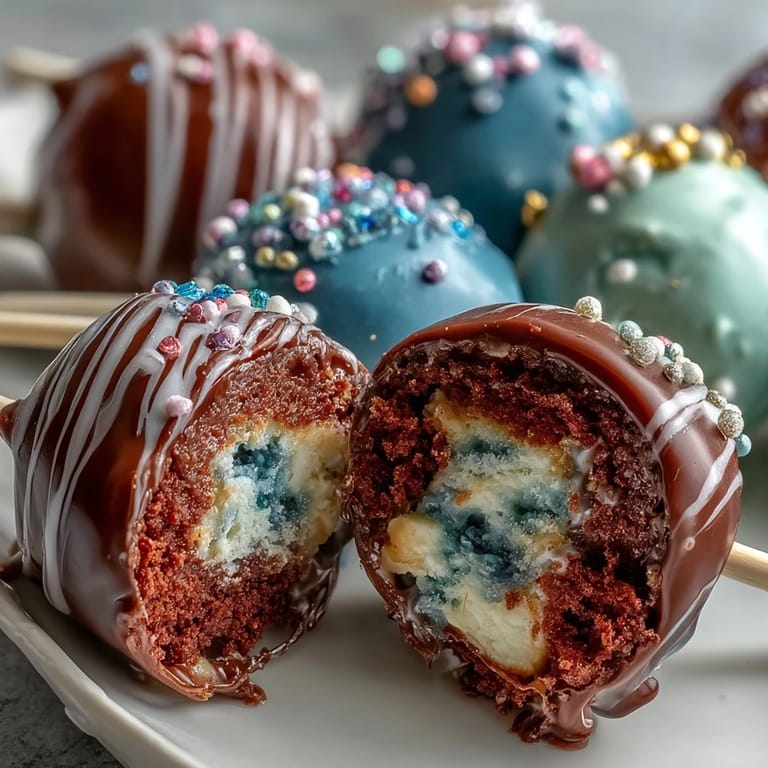
 There's something about making cake pops that turns you into a sculptor, not just a baker. I discovered this while standing in my kitchen on a rainy afternoon, trying to impress my sister who'd just gotten really into astrology. She mentioned Pisces, I thought of galaxies, and suddenly I was swirling purple and teal into white chocolate like I was painting tiny edible universes. That first batch was messy, my hands were sticky, but when she bit into one and her eyes lit up, I understood why people become obsessed with these little treats.
My mom watched me make these for her book club and asked if I could do a batch in her favorite colors. Seeing her hand them around with pride, listening to her friends ask for the recipe, made me realize this wasn't just about pretty desserts—it was about giving people something that felt special and a little bit magical.
Ingredients
- 1 box vanilla cake mix (or homemade equivalent): This is your foundation, and honestly, the box mix is your friend here because you want tender, moist cake that crumbles beautifully without being dry.
- Ingredients as required by cake mix (usually eggs, oil, water): Follow the package directions exactly—this is one time precision matters before the fun decorating begins.
- 1/2 cup (115 g) unsalted butter, softened: Room temperature butter creams smoothly and binds the frosting to cake crumbs like an edible glue.
- 1 1/2 cups (180 g) powdered sugar: The fine texture dissolves into the butter and keeps your cake pop mixture workable without being too sweet.
- 2 tbsp milk: This small amount adjusts the consistency so your mixture holds together without becoming dense or grainy.
- 1 tsp vanilla extract: A humble ingredient that lifts the entire flavor and makes people ask what your secret is.
- Pinch of salt: This tiny amount balances sweetness and makes every flavor more vibrant than you'd expect.
- 12 oz (340 g) white chocolate or candy melts: Candy melts are more forgiving and set faster, but real white chocolate tastes richer if you're patient with tempering.
- Gel food coloring (navy blue, purple, teal, black, pink): Gel coloring is non-negotiable here because liquid food coloring will seize your chocolate, and I learned that the hard way.
- Edible glitter (silver, blue, or iridescent): This is where the magic happens—buy quality glitter that actually shimmers instead of just looking dull.
- 24 lollipop sticks: These give you something to hold and make presentation effortless.
- Sprinkles or sugar pearls (optional, for extra decoration): Optional doesn't mean skip it—these add texture and catch the light beautifully.
Tired of Takeout? 🥡
Get 10 meals you can make faster than delivery arrives. Seriously.
One email. No spam. Unsubscribe anytime.
Instructions
- Bake and cool your cake:
- Follow your cake mix instructions and let that cake cool completely—this matters because warm cake won't crumble properly and will stick to your hands instead of forming neat balls. I've rushed this step before and regretted it.
- Crumble into submission:
- Take a fork and break that cooled cake into fine, uniform crumbs until it looks like wet sand. You want no chunks because chunks prevent smooth rolling.
- Cream the frosting base:
- Beat your softened butter until it's pale and fluffy, which takes longer than you'd think but matters for texture. This is where your mixer becomes your best friend.
- Build your frosting:
- Add powdered sugar, milk, vanilla, and salt to the creamed butter and beat until completely smooth with no lumps. This frosting tastes like whipped clouds.
- Marry cake and frosting:
- Add frosting to your cake crumbs gradually while mixing, stopping when the mixture just holds together when pressed. It should feel like slightly damp sand, not wet dough.
- Roll into perfection:
- Form 1.5-inch balls and place them on parchment paper, then chill for at least an hour—this makes them firm enough to dip without falling apart. I keep mine in the fridge overnight if I'm not in a rush.
- Melt your chocolate base:
- Microwave white chocolate in 30-second bursts, stirring between each one to avoid overheating and seizing. It should be smooth and pourable but not hot.
- Create galaxy colors:
- Divide your melted chocolate into small bowls and add gel food coloring drop by drop, stirring thoroughly. Start with less color than you think you need because it deepens as you stir.
- Insert the sticks:
- Dip each lollipop stick tip into melted chocolate and push it halfway into a chilled cake ball. The chocolate acts like glue to keep it secure.
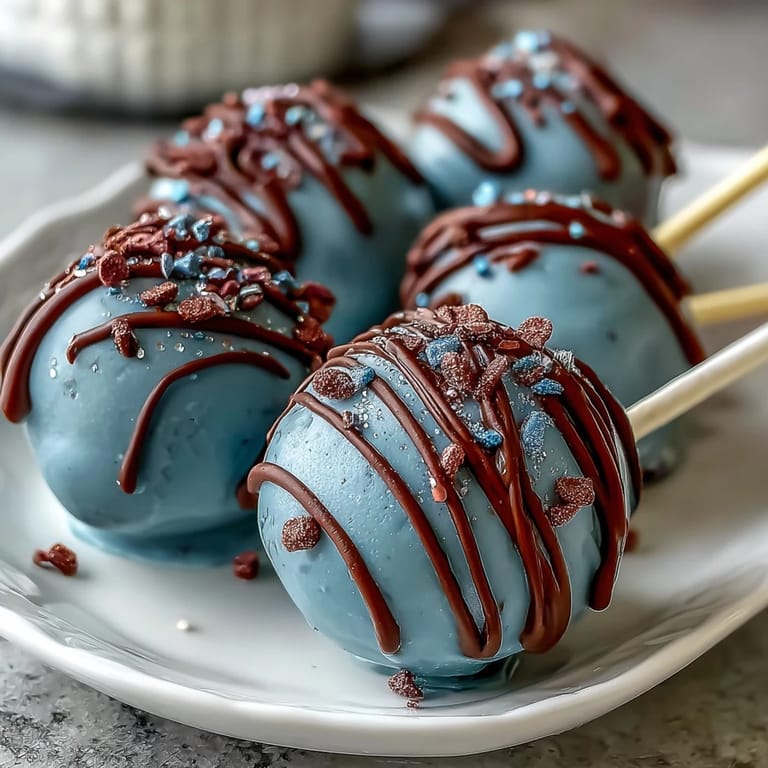
- Dip and swirl:
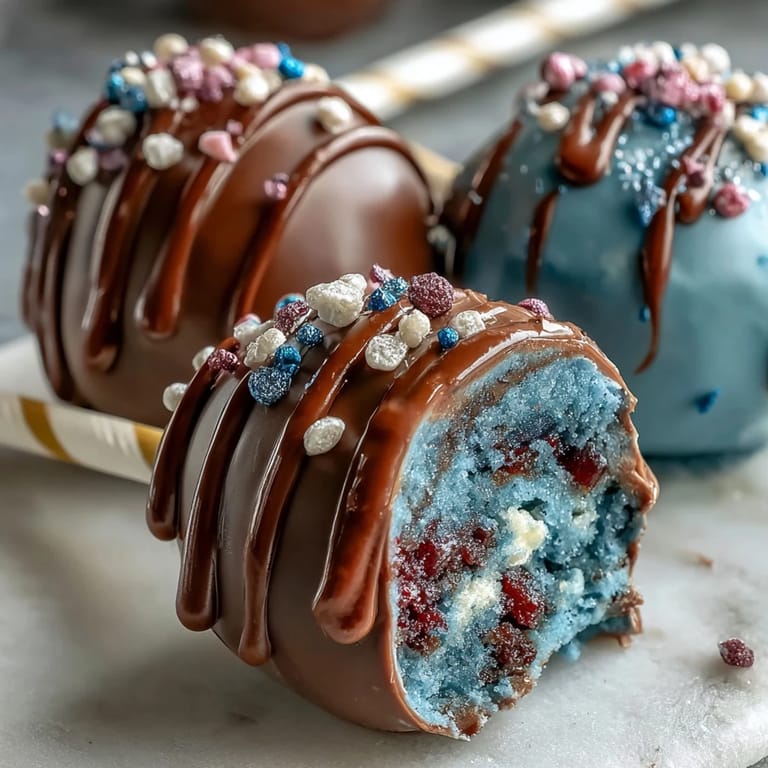
- Submerge each cake pop into your colored chocolate and give it a gentle twist so the colors blend into galaxy patterns. The swirling is the fun part—this is where your artistic instincts take over.
- Drip and set:
- Hold each pop upright over the bowl to let excess chocolate drip off, then place it in a styrofoam block or cake pop stand. They'll set faster if you work quickly.
- Glitter while tacky:
- Sprinkle edible glitter and optional sprinkles onto the coating while it's still slightly sticky so everything adheres. This is the magic moment.
- Final set:
- Let them cure at room temperature or in the fridge until the coating is completely hard. Room temperature takes about 20 minutes; the fridge takes about 10.
 Save to Pinterest
 My neighbor tasted one of these and asked me to make them for her daughter's birthday party. Watching a room full of kids light up when they saw those shimmering galaxy pops made me understand that sometimes the best cooking moments aren't about perfection—they're about creating something that makes people feel like you made something just for them.
The Science of Cake Pop Structure
What makes a cake pop stay together isn't magic—it's the balance between crumbs and frosting. You need just enough frosting to act as a binder, but not so much that your mixture becomes heavy and won't hold its shape. Think of it like making a snowball: too dry and it falls apart, too wet and it becomes a solid lump. The frosting also adds richness that plain cake crumbs could never deliver on their own, which is why store-bought cake pop bases never taste quite right.
Chocolate Coating Mastery
The difference between a professional-looking cake pop and a sad one comes down to your chocolate temperature and consistency. If your chocolate is too thick, it'll coat unevenly and look bumpy; too thin and it'll drip off in a puddle. The sweet spot is warm enough to flow smoothly but cool enough to set quickly. I've learned to let my chocolate sit for a minute after melting, giving it time to thicken just slightly before dipping.
Color Blending and Galaxy Magic
Creating that swirled galaxy effect is less about having a steady hand and more about understanding how colors behave when they meet. When you dip a pop into one color and twist it through another, the friction creates natural blending patterns that are genuinely beautiful and totally unique every time. The trick is resisting the urge to swirl too much—sometimes the prettiest pops come from a single confident twist rather than anxious overcorrecting.
- Start with deeper colors like navy and purple, then accent with brighter teals and pinks for maximum visual impact.
- Let your glitter do the heavy lifting in the design department—it makes even imperfect coating look intentional and gorgeous.
- Remember that edible glitter sticks better to tackier chocolate, so timing your application is everything.
 Save to Pinterest
 These Pisces-inspired cake pops are the kind of treat that reminds you why baking matters—it's not just about eating something delicious, it's about creating something that feels thoughtful and special. Once you make your first batch, you'll be thinking of reasons to make them again.
Recipe FAQ
- → How do I achieve the galaxy swirl effect on the cake pops?
Use gel food coloring to tint separate portions of melted white chocolate in navy blue, purple, teal, black, and pink. Dip each cake pop gently into multiple colors, swirling the coating to mimic galaxy patterns before it sets.
- → What is the best way to ensure the cake pops hold their shape?
Mix the cake crumbs and frosting thoroughly until the mixture holds together when pressed, then chill the rolled balls in the fridge for at least an hour before coating.
- → Can I substitute the white chocolate with another coating?
Yes, candy melts are a good alternative as they melt smoothly and hold color well, supporting the galaxy design nicely.
- → How should I store these pops to maintain freshness?
Store in an airtight container in the refrigerator for up to 5 days to keep the texture and decoration intact.
- → Are there any tips for adding a Pisces touch to decorations?
Consider using fish-shaped sprinkles or drawing Pisces symbols with melted chocolate for a personalized celestial flair.
- → What tools are necessary for creating these cake pops?
A hand or stand mixer, mixing bowls, baking sheet lined with parchment, microwave-safe bowls for melting chocolate, lollipop sticks, and a styrofoam block or stand for drying are recommended.