 Save to Pinterest
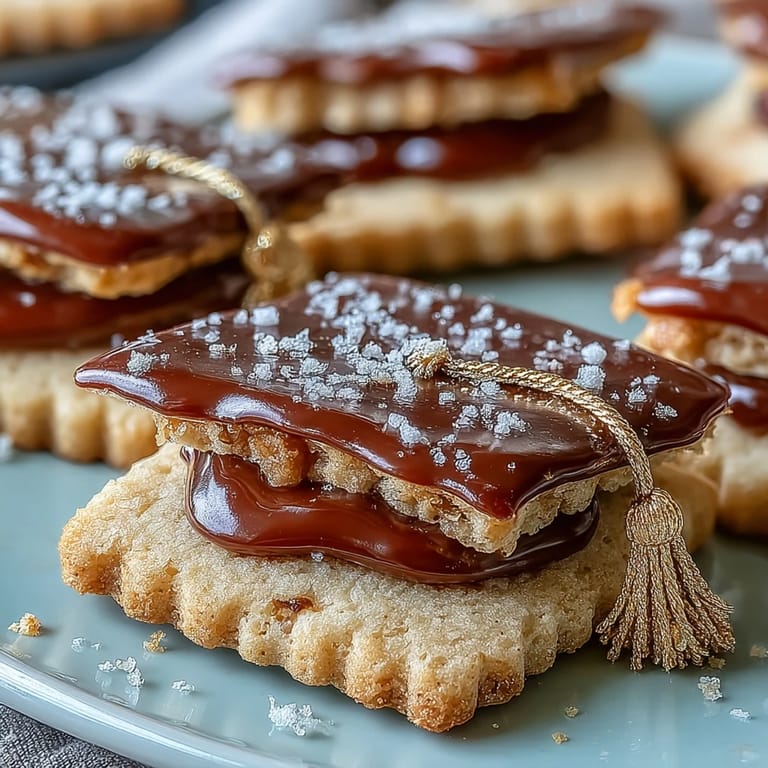
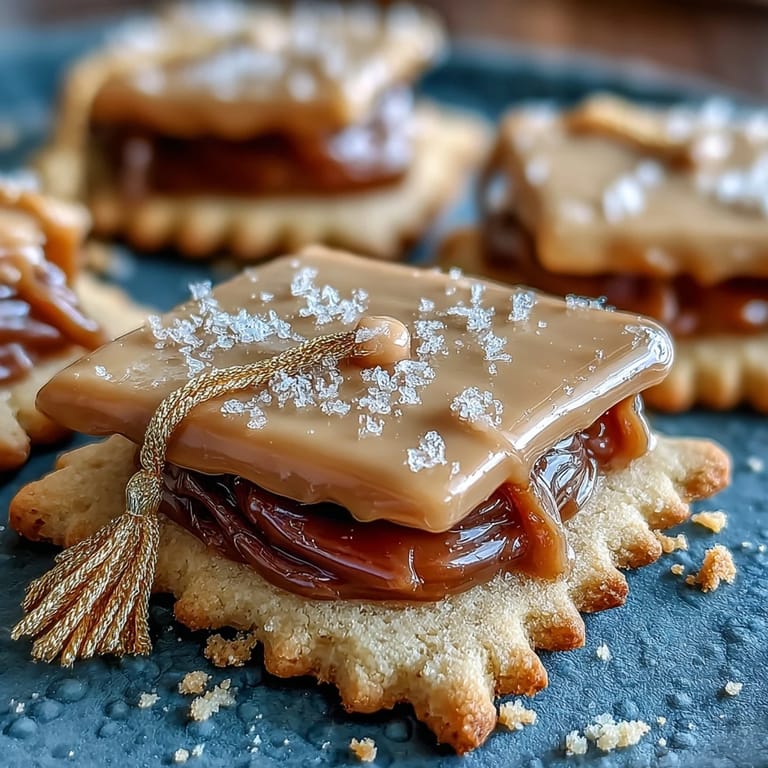
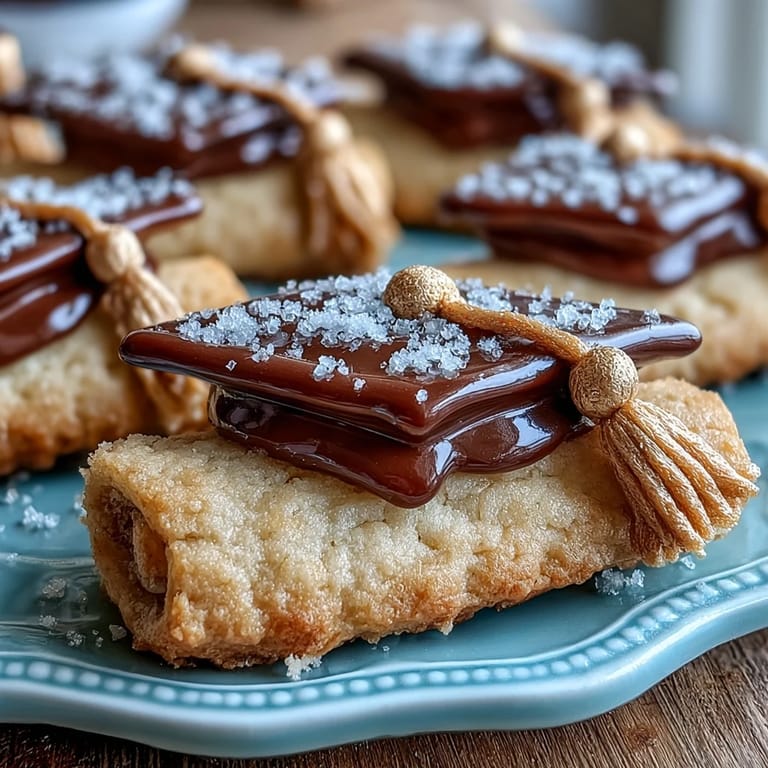
 The clinking of measuring cups always brings a certain sense of occasion, but nothing quite strikes the celebratory chord like baking graduation cookies shaped as diplomas and caps, finished with regal gold details. One idle Saturday, as rain pinged against the window, I set out to make these sweet tokens for my cousin’s graduation picnic. The process became unexpectedly joyful: tracing cap shapes with my niece, then giggling as royal icing dripped on our noses. By the end, the whole kitchen smelled of vanilla and accomplishment, with glimmering golden tassels drying by the light. Honestly, no bakery treat has ever felt so full of anticipation and pride.
When my younger brother tossed his graduation cap in the real world, I surprised him (and a skeptical crowd of teenagers) with a towering platter of these cookies. We laughed at my wobbly piping on a few caps, but every last crumb disappeared long before the speeches were over.
Ingredients
- All-purpose flour: Use fresh, high-quality flour to keep the cookies tender; I once learned that old flour gives a stale aftertaste.
- Unsalted butter: Let it come fully to room temperature—cold butter never creams properly in this recipe.
- Granulated sugar: Gives classic sweetness and ensures crisp edges without being gritty.
- Large egg: Binds the dough together; make sure it's at room temperature for even mixing.
- Pure vanilla extract: Adds warmth and aroma — real vanilla is worth it for celebrations.
- Almond extract (optional): For subtle nutty undertones; try lemon extract if you want a citrus twist.
- Salt: Just a small amount balances out the sweetness beautifully.
- Powdered sugar: Sifted well, so your royal icing is glossy and smooth.
- Egg whites (or meringue powder + water): Provides volume and stability for icing; meringue powder is handy when serving kids.
- Cream of tartar: This tiny addition keeps the icing thick and prevents sugar crystallization.
- Vanilla extract (for icing): A dash rounds out the flavor, so the icing matches the cookies.
- Black gel food coloring: Deep color, so your graduation caps look sharp and defined.
- Gold luster dust + clear alcohol or lemon extract: Turns your cookies from tasty to positively radiant with a sweep of a brush.
Tired of Takeout? 🥡
Get 10 meals you can make faster than delivery arrives. Seriously.
One email. No spam. Unsubscribe anytime.
Instructions
- Cream the Butter and Sugar:
- In a large bowl, beat the soft butter with sugar until it's fluffy and pale—pause to notice how light the mixture feels under your spatula.
- Add the Wet Ingredients:
- Beat in the egg, vanilla, and almond extract if using; listen for the little slaps as the dough thickens and smells start to swirl around you.
- Mix in Dry Ingredients:
- Gradually add the flour and salt, stirring until just combined; stop as soon as the dough gathers together, resisting the urge to overwork it.
- Chill the Dough:
- Divide in half, flatten into discs, and wrap tightly; chill them in the fridge until they're firm but pliable—45 minutes is usually perfect.
- Cut Out Cookies:
- Roll chilled dough to 1/4-inch thick on a floured surface, then cut out diploma and cap shapes, dipping cutters in flour if needed to prevent sticking.
- Bake:
- Arrange on parchment-lined sheets and bake at 350 F until the bottoms are just golden, about 8 to 10 minutes; the kitchen will fill with a sweet, buttery scent.
- Cool Completely:
- Transfer to wire racks and let cool fully before icing; this step makes decorating a breeze.
- Make the Royal Icing:
- Beat egg whites until frothy, then add sifted powdered sugar and cream of tartar; watch for stiff, glossy peaks before stirring in vanilla.
- Tint and Prep Icing:
- Split into bowls: tint some black for the caps, leave some white for diplomas, and keep a portion plain for gold accents.
- Decorate:
- Pipe outlines, flood in color, and add details—patience pays off here; let cookies set for an hour so icing fully hardens.
- Add Gold Accents:
- Mix gold luster dust with a drop or two of clear alcohol, then brush on tassels and diploma bands; the transformation is magical and quick-drying.
 Save to Pinterest
  Save to Pinterest
 Watching everyone admire (and eventually devour) these sparkling cookies at our backyard celebration, I realized that sometimes food really can capture a milestone—especially when you brush a little gold onto the moment.
Getting the Icing Just Right
Royal icing can be tricky if you're new to it—my first batch was a runny disaster. Make yours thick enough that it holds a ribbon when the beater is lifted, then add a drop of water at a time for flooding. This helps the outlines stay sharp while the centers self-level. I like to test a small amount on wax paper before committing.
Choosing Cookie Cutters and Tools
I once scavenged two stores for the perfect diploma cutter, only to discover that a sharp knife and steady hand worked just as well in a pinch. Dedicated cookie cutters will speed things up if you have them, especially when batch baking. And a fine-tip piping bag is a game changer for tiny tassels and outlines. Don't forget a food-safe paintbrush for those dramatic gold flourishes.
Make-Ahead and Storage Tips
These cookies hold up beautifully if made ahead—on busy celebration weeks, I've baked them days before and finished icing the night before serving. Once dry, they stack neatly in an airtight container without smudging. If decorating with kids, bake the cookies in advance so you can focus just on the fun flourishes.
- Store cookies in a cool, dry place to keep the icing crisp.
- If you want extra shine, dust on more luster right before serving.
- Remember to check for allergens in any unique sprinkles or food colors you add.
 Save to Pinterest
  Save to Pinterest
 Whether you’re celebrating a big achievement or just want an excuse to play with gold icing, these cookies turn every gathering into something a little more unforgettable.
Recipe FAQ
- → How do I keep the cookies from spreading?
Chill the dough thoroughly before rolling and again on the sheet pan if needed. Use a 1/4-inch thickness, avoid overworking the dough, and make sure butter is not too soft at mixing.
- → What consistency should the royal icing be for flooding?
For flooding, thin royal icing to a ribbon-like consistency that levels out in about 10–15 seconds when dribbled from a spoon. Keep a stiffer icing on hand for outlines and details.
- → Can I substitute meringue powder for egg whites?
Yes. Use the equivalent meringue powder and water ratio (about 4 tbsp powder + 6 tbsp water for 2 egg whites) to ensure stable, food-safe royal icing that dries glossy and firm.
- → How do I apply the edible gold without smudging the icing?
Allow royal icing to dry completely (at least 1 hour, longer for thicker layers). Mix gold luster dust with a few drops of clear alcohol or lemon extract, then use a fine, food-safe brush to gently paint accents.
- → How long do the decorated cookies keep?
Store in an airtight container at room temperature for up to 1 week. Place parchment between layers to protect decorations; avoid humid environments to prevent the icing from softening.
- → Any tips for sharp edges on cap and diploma shapes?
Chill cut cookies on the baking sheet for 10–15 minutes before baking to help retain shape, and use a firm, even roll with minimal flour on the surface to preserve crisp edges.