 Save to Pinterest
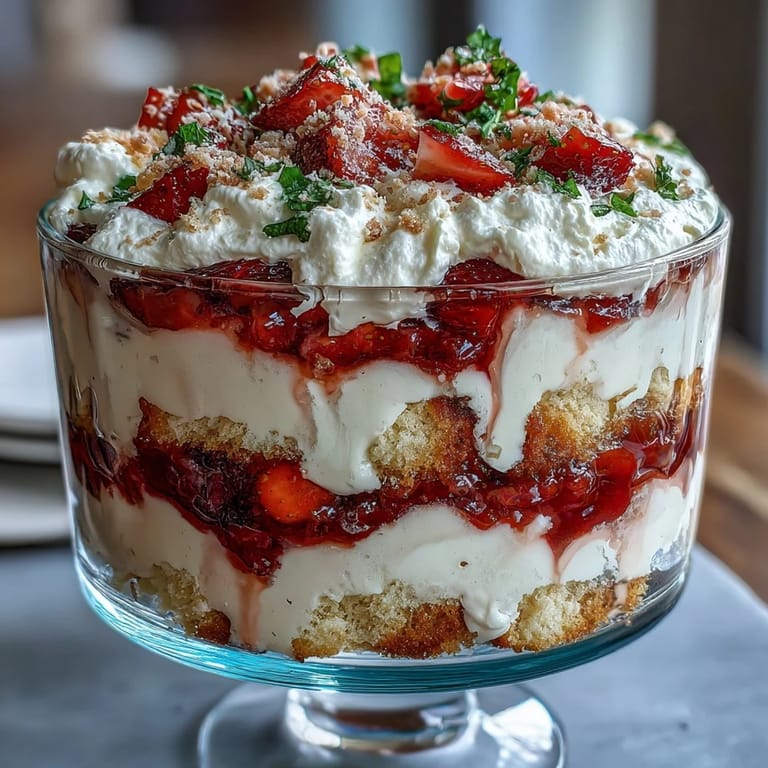
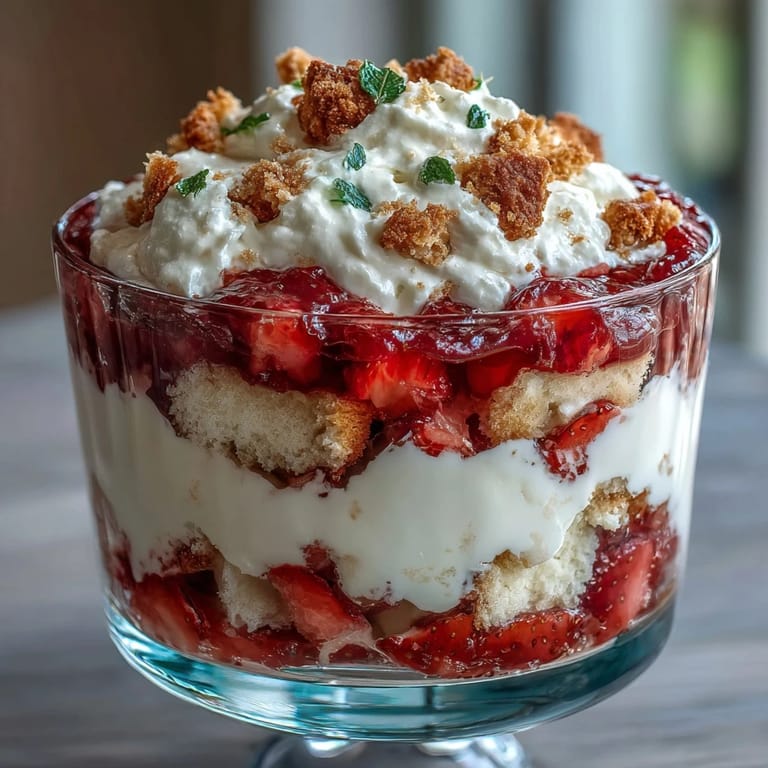
 The scene in my kitchen always changes in spring, and nothing signals the season more than the scent of strawberries—especially when I’m prepping them for this trifle. There’s a quiet ritual I enjoy: hulling the berries and sneaking a juicy one or two as I build the layers. Unlike fussy pastries, this dessert makes elegance feel effortless. The real fun? Watching the vanilla cake cubes soak up berry juices, ready to embrace billowy clouds of whipped cream.
Last summer, I volunteered to bring dessert to a friend's backyard potluck and, despite my nerves about transporting it, layered this trifle in a punch bowl. The oohs and ahhs as I carried it out felt like an award, and I realized how a simple dessert can steal the show.
Ingredients
- All-purpose flour: I sifted it for a softer crumb—clumps are the enemy of tender cake.
- Granulated sugar: Sweetens both the cake and berries, but go just enough; overdoing it masks the fresh flavor of the fruit.
- Unsalted butter: Room temperature is crucial—I once forgot, and the batter never properly creamed.
- Eggs: Let them sit out while you prep; they blend more smoothly when not fridge-cold.
- Whole milk: Gives the cake moisture and richness, so don’t swap for low-fat here.
- Baking powder: Makes the cake rise just right, but measure carefully to avoid bitterness.
- Salt: A small pinch sharpens the vanilla and sweet notes in the cake.
- Vanilla extract: Opt for pure extract for full depth—artificial just doesn’t sing here.
- Fresh strawberries: Peak season berries are a game changer, so smell before you buy.
- Lemon juice: Brightens the strawberries and balances the sugar—never skip it.
- Powdered sugar: Melts seamlessly in the whipped cream for a smooth finish.
- Heavy whipping cream: Chill your bowl and beaters too for the fluffiest result.
Tired of Takeout? 🥡
Get 10 meals you can make faster than delivery arrives. Seriously.
One email. No spam. Unsubscribe anytime.
Instructions
- Preheat and Prepare Pan:
- Start by warming your oven to 350°F and running a little butter and flour around your baking pan—it helps the cake slide out later.
- Cream the Butter and Sugar:
- Use an electric mixer and let it run until the mixture looks pale and fluffy, almost cloud-like.
- Mix Dry Ingredients:
- Whisk flour, salt, and baking powder together and watch for even color in the bowl—no streaks.
- Create Batter:
- Add dry ingredients and milk alternately to the creamed mixture; it should look smooth but not overbeaten.
- Bake the Cake:
- Pour into your prepared pan, slide into the oven, and bake until the center springs back and a toothpick comes out clean, about 25–30 minutes.
- Prepare Strawberries:
- While cake cools, toss sliced strawberries with sugar and lemon juice and let sit until they become glossy and juicy.
- Whip the Cream:
- Cold tools are your secret weapon—beat cream, powdered sugar, and vanilla until soft, airy peaks form.
- Cut the Cake:
- Once cooled, slice cake into 1-inch cubes—a serrated knife helps keep the pieces neat.
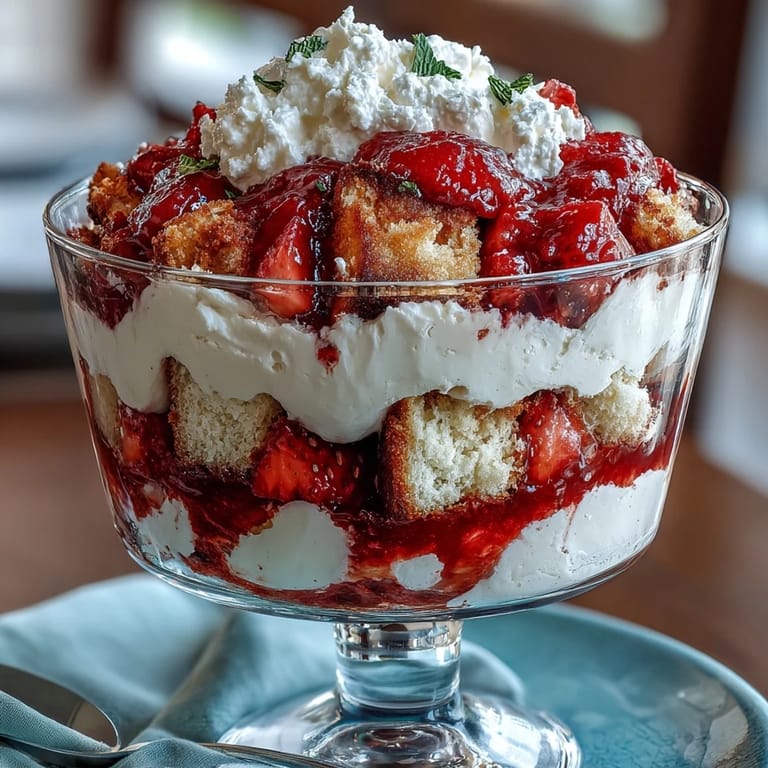
- Layer the Trifle:
- In glasses or a trifle dish, layer cake, juicy strawberries, and whipped cream, repeating and finishing with a flourish of cream and berries on top.
- Chill or Serve:
- You can serve immediately or chill for up to 2 hours—the flavors mingle as it sits, but don’t wait too long or the cake gets mushy.
 Save to Pinterest
 The best compliment I ever received was when a child at a family reunion called this trifle "a taste of summer in a glass"—I had to laugh, because there was still a smudge of whipped cream on her nose.
Layering Like a Pro
Instead of rushing, I found it helps to plan out your cake and berry layers so every scoop delivers all three components. A little overlap makes for better flavor mingling, and letting the berries nestle into the cake ensures every bite has something juicy and something fluffy.
Serving in Style
Clear glasses or a trifle bowl let you show off those gorgeous stripes of cake, cream, and fruit. I’ve even used stemless wine glasses for smaller crowds, and it made everyone feel extra special to have their own personal trifle.
Ways to Make It Your Own
Once, for adults only, I stirred a splash of Grand Marnier into the berries for a little celebratory kick; on another occasion, I tossed in some blueberries for contrast. If you spot fresh mint, it adds a pop of green that makes the dessert look straight out of a magazine.
- Be sure to dry your berries thoroughly after washing so layers don’t get watery.
- Pound cake or angel food cake both work if time is short.
- Leftovers are rare, but if you have any, they’re best by the next day.
 Save to Pinterest
 Here’s to desserts that bring out the smiles and the stories—may your trifle be as beautiful to share as it is delicious to eat.
Recipe FAQ
- → How long should strawberries macerate?
Macerate sliced strawberries with sugar and a splash of lemon for at least 20 minutes to release juices and soften the fruit; longer maceration (up to an hour) yields a sweeter, saucier layer.
- → How do I keep whipped cream stable?
Use chilled heavy cream and a touch of powdered sugar; beat to soft or medium peaks and chill until assembly. For extra stability, fold in a small amount of mascarpone or stabilizer like gelatin if needed for longer holds.
- → Can I use store-bought cake?
Yes — pound cake, angel food, or store-bought vanilla sponge work well. Cut into 1-inch cubes and toss briefly in berry juices or a syrup to keep layers moist and flavorful.
- → What's the best way to assemble for individual servings?
Use clear glasses to show the layers. Start with a cake layer, spoon berries with their juices, add whipped cream, and repeat. Finish with cream and a few sliced berries for an attractive top.
- → Can I add alcohol to the strawberry layer?
Yes — a splash of Grand Marnier, limoncello, or orange liqueur added to the berries complements the vanilla cake. Keep additions light so the fruit remains fresh and not overly boozy.
- → How far ahead can I assemble this?
Assemble up to 2 hours ahead and chill. Leaving assembled trifle much longer can soften the cake excessively; for best texture, assemble close to serving time or keep components separate until ready.