 Save to Pinterest
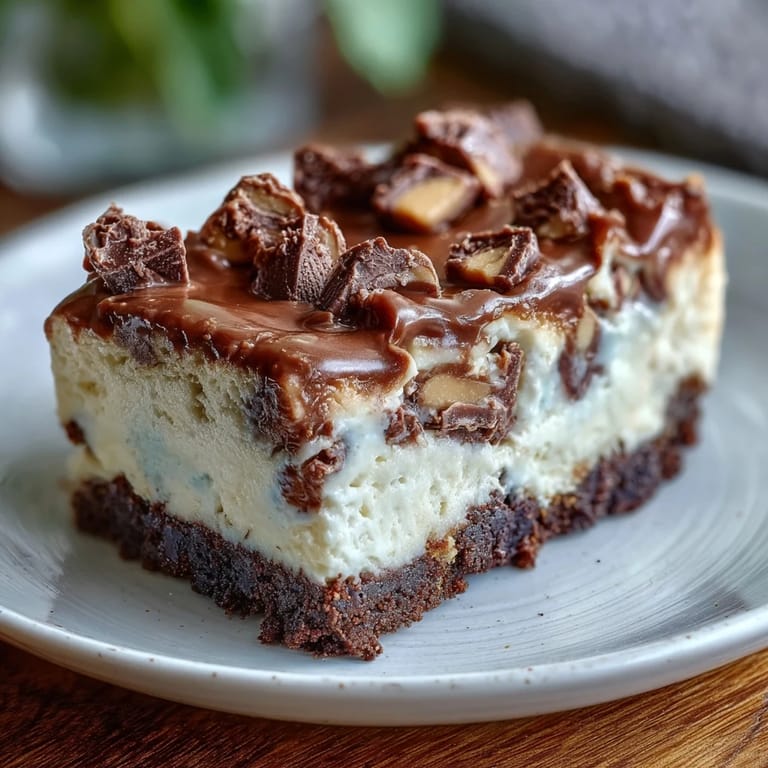
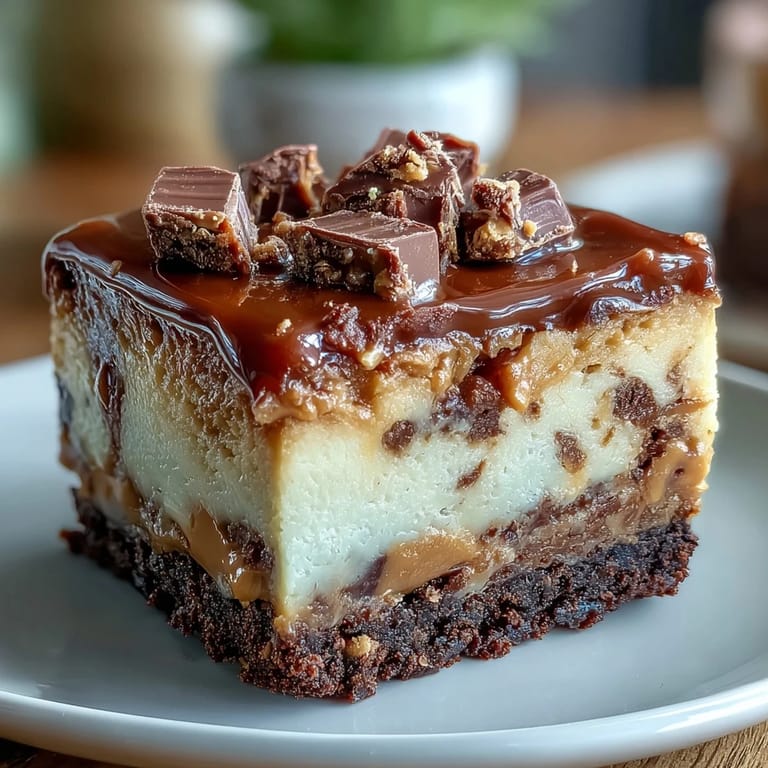
 My cousin texted me a photo of these peanut butter cup cheesecake bars at a potluck, and I spent the entire drive home mentally reverse-engineering every layer. There's something about the collision of creamy cheesecake, crushed chocolate cookies, and those little melted peanut butter cups that just works. When I finally made them, the kitchen smelled like a candy factory mixed with a bakery, and I knew I'd stumbled onto something worth repeating. These bars have since become my go-to when I need dessert that feels fancy but doesn't require a degree in pastry arts.
I brought these to a work bake sale once, slightly nervous because cheesecake has a reputation for cracking and collapsing. Instead, they came out perfect, and I watched people's faces light up when they bit into the peanut butter swirl. One coworker asked for the recipe right there, pen in hand, which felt like winning the dessert lottery.
Ingredients
- Chocolate cookie crumbs: Use Oreos with the cream scraped out for a pure chocolate flavor, or keep some cream if you like extra richness.
- Unsalted butter: This lets the chocolate and peanut butter shine without competing salt flavors.
- Cream cheese: Room temperature is non-negotiable here—cold cream cheese won't blend smoothly and you'll end up with lumps.
- Sour cream: This adds a subtle tang that balances the sweetness and keeps the texture from feeling one-dimensional.
- Creamy peanut butter: The kind you'd eat straight from the jar, not the natural oil-separated stuff (save that for another recipe).
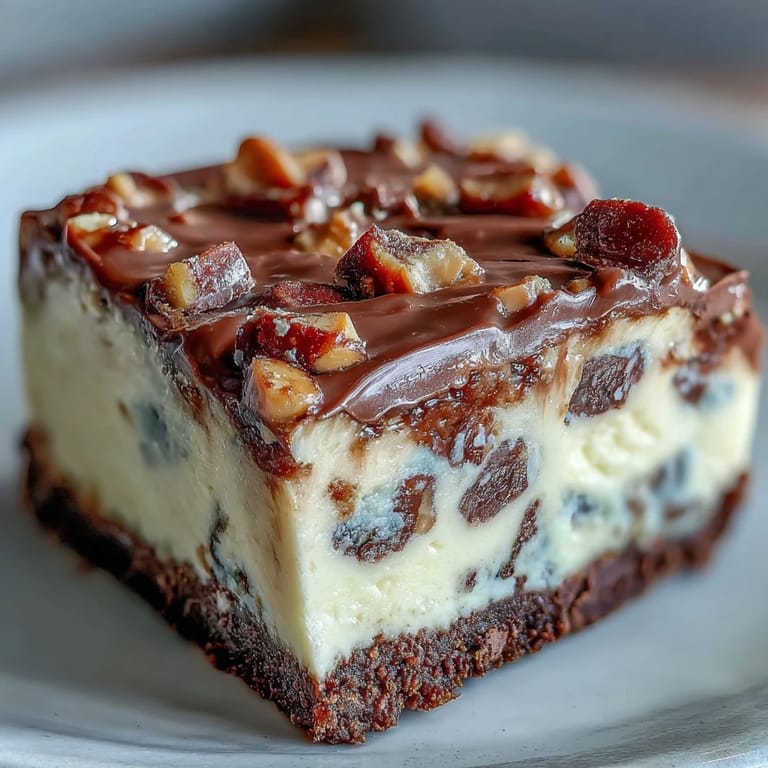
- Mini peanut butter cups: Roughly chop them so they stay recognizable in each bite rather than dissolving completely.
Tired of Takeout? 🥡
Get 10 meals you can make faster than delivery arrives. Seriously.
One email. No spam. Unsubscribe anytime.
Instructions
- Set up and preheat:
- Get your oven to 350°F and line that 9x9-inch pan with parchment, letting it overhang the sides so you can lift the whole thing out later without wrestling it. This is a small step that saves enormous frustration.
- Build your chocolate foundation:
- Combine the cookie crumbs, melted butter, and sugar until it looks like wet sand, then press it down firmly into the pan with your fingers or the bottom of a measuring cup. Bake for 8 minutes just to set it slightly, then let it cool while you move forward.
- Whip the cream cheese base:
- Beat the softened cream cheese and sugar together until it's completely smooth and pale, about 2-3 minutes. Scrape down the bowl sides frequently because lumps hiding in the corners will ruin the vibe.
- Fold in the eggs carefully:
- Add each egg one at a time, beating just until combined after each addition—overmixing here can trap too much air and cause the dreaded cracks. Add the sour cream, peanut butter, and vanilla, stirring until you have a uniform, silky mixture.
- Add the peanut butter cup texture:
- Fold in about 1 cup of the chopped peanut butter cups gently so they stay distributed throughout rather than sinking to the bottom. Reserve the rest for the top so you get peanut butter cup moments in every slice.
- Layer and bake:
- Pour the filling over your cooled crust and spread it evenly, then scatter the remaining chopped peanut butter cups across the top. Bake for 25-28 minutes until the center jiggles just slightly when you shake the pan—this is the sweet spot between underbaked and overbaked.
- Chill with patience:
- Let these cool completely at room temperature first, then refrigerate for at least 2 hours. Rushing this step will give you a warm, floppy bar instead of that clean, satisfying bite.
- Finish and serve:
- Drizzle melted peanut butter over the top and scatter chocolate chips if you're feeling fancy, then slice with a sharp knife wiped clean between cuts. Serve chilled for maximum creamy texture.
 Save to Pinterest
 The best part happened when my neighbor saw me taking these out of the fridge on a Sunday afternoon and asked if I'd made them for a reason. When I said no, just because, she asked if I'd ever considered a side business. That's when you know a recipe has crossed from good to genuinely memorable.
The Crust Matters More Than You'd Think
People often skimp on the crust like it's just a formality, but those 8 minutes of pre-baking actually transform the texture from soggy to structured. I learned this the hard way when I skipped that step and ended up with a bottom layer that felt mushy instead of providing contrast. Now I treat that little pre-bake like it's the foundation of a house—because honestly, it kind of is.
Why Chocolate Cookies Over Regular Graham Crackers
The chocolate cookie base isn't just flavor—it's a visual and textural anchor that makes the whole bar feel more intentional. I've experimented with graham crackers and vanilla wafers, and they disappear into the cheesecake without adding anything distinctive. The chocolate stands up to the peanut butter filling like an equal partner instead of fading into the background.
Storage and Serving Wisdom
These bars actually taste better after sitting in the fridge for a day because the flavors settle and marry together more completely. The peanut butter flavor becomes almost mellow, and the chocolate cookie base holds its structure better. They'll keep for up to 5 days in an airtight container, though they rarely last that long in my house.
- Slice these with a hot, wet knife and wipe it clean between cuts for sharp edges instead of squished sides.
- Bring them to room temperature for about 10 minutes before serving if you want the cheesecake to taste creamier and less dense.
- These freeze beautifully for up to 3 months, so make a double batch and you'll have emergency dessert whenever you need it.
 Save to Pinterest
 These bars have genuinely made me feel like a better baker, which is saying something coming from someone who once burned brownies. They're proof that sometimes the simplest combinations, made with care and a little patience, are exactly what people remember.
Recipe FAQ
- → What type of crust is used for these bars?
A chocolate cookie crumb crust made from crushed Oreos with melted butter and sugar forms a firm base for these bars.
- → Can I substitute the peanut butter in the filling?
Yes, almond butter can be used as a substitute, especially if peanut allergies are a concern.
- → How long should the bars chill before serving?
Chill the bars for at least 2 hours in the refrigerator to allow them to set properly and develop a smooth texture.
- → Are the mini peanut butter cups mixed in or only on top?
Both: some are folded into the filling for bursts of flavor, with more sprinkled on top before baking.
- → What is the best way to serve these bars?
Serve chilled and sliced into bars, optionally paired with cold milk or a light-bodied coffee to balance the richness.