 Save to Pinterest
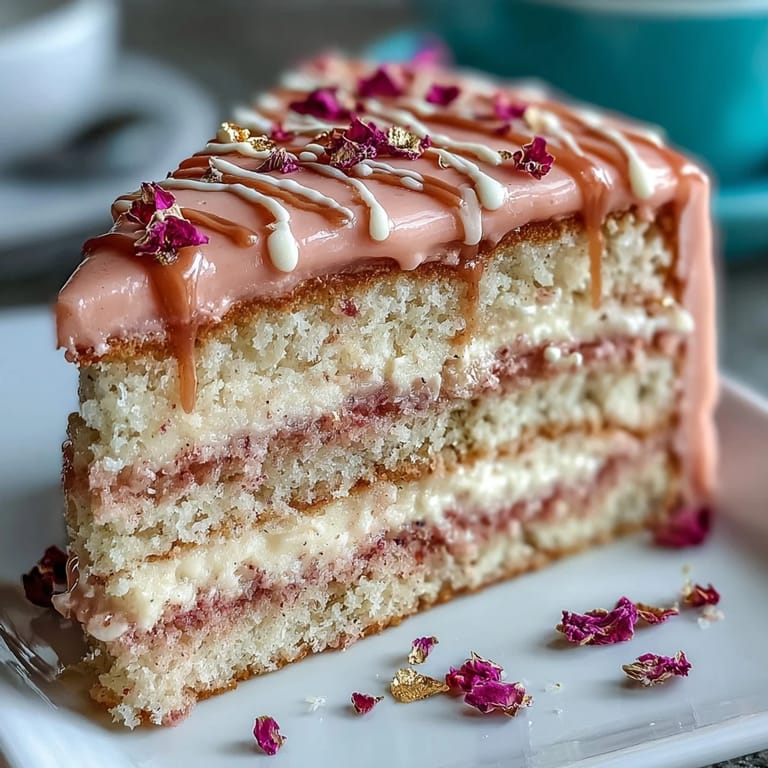
 The scent of rosé mingling with vanilla and cocoa instantly transports me back to the time sunlight streamed into the kitchen, glinting off bowls and spoons as I set out to create something that felt unabashedly celebratory. Sometimes, you just have to turn music on, tie your apron without worrying about perfect bows, and let the swirl of cake batter promise something magical. This Rosé Velvet Cake was born from that kind of afternoon—just me, my slightly sticky recipe notecard, and a mess of pink food coloring on my hands. It looked impossibly elegant in the end, though in the moment nothing felt fancy but the laughter echoing off the countertops.
One Saturday, prepping for a cousin's bridal shower, I found myself nervously piping clouds of cream cheese frosting as bridesmaids drifted in and out to 'check on the cake.' Each layer came out perfectly pink, and when my aunt peeked in to see me painting chocolate drips with edible gold, her delighted gasp made the fuss worth it. Sometimes, baking a cake turns into an audience event—everyone wants in on the magic, and you end up sharing not just dessert but the joy of making it together.
Ingredients
- All-purpose flour: Gives the cake its soft, classic crumb; I find sifting prevents pesky lumps and keeps the texture dreamy.
- Cornstarch: A touch here makes each bite noticeably tender—don’t skip it.
- Unsweetened cocoa powder: Just enough to deepen the pink hue; go for Dutch-processed for that mellow chocolate note.
- Baking soda: Keeps things light and helps the cake rise elegantly.
- Salt: Don’t underestimate it—it makes the flavors sing and balances all the sweetness.
- Unsalted butter: Room temp is a must, or you’ll struggle to cream it; cold butter makes for dense cakes.
- Granulated sugar: Essential for structure and sweetness; measure with a gentle hand for a light crumb.
- Light brown sugar: Adds subtle caramel notes that play beautifully with the rosé.
- Eggs: Let them come to room temperature first; it keeps the batter smooth and helps the cake rise evenly.
- Rosé wine: Choose a bottle you enjoy drinking—the flavor matters, and cheap wine just won’t give the same magic.
- Buttermilk: Adds moisture and tang, resulting in a plush crumb (I always double check I’ve got fresh buttermilk before starting).
- Vanilla extract: Real vanilla rounds out all the other flavors—skip the imitation!
- Pink gel food coloring: For those perfect blush layers; use a light hand, as a tiny drop can turn things neon fast.
- Cream cheese: Warm it up for 30 minutes before mixing so your frosting never gets lumpy.
- Confectioners’ sugar: Sifted is non-negotiable for the silkiest frosting (learned the hard way).
- White chocolate chips: They melt smoothest for the drip—cheaper brands can seize, so use a reliably creamy one.
- Heavy cream: Balances the chocolate in your drip and gives it just the right fluidity to cascade down the cake.
- Edible gold luster dust: The crowning touch; save your best soft brush for this magical step.
- Clear vodka or lemon extract: Turns the gold dust into paint—tiny amounts are all you need.
Tired of Takeout? 🥡
Get 10 meals you can make faster than delivery arrives. Seriously.
One email. No spam. Unsubscribe anytime.
Instructions
- Prep the pans and oven:
- Set your oven to 350°F (175°C) and line three 8-inch pans so nothing sticks to that delicate crumb.
- Mix the dry ingredients:
- Whisk together your flour, cornstarch, cocoa powder, baking soda, and salt until they look like one soft floury blanket.
- Cream the butter and sugars:
- Beat butter, granulated sugar, and brown sugar until they're pale and fluffy—it should smell like caramel and promise.
- Add the eggs and vanilla:
- Drop in the eggs one at a time, letting each disappear before adding the next, then stir in your vanilla extract.
- Combine rosé and buttermilk:
- Pour your rosé and buttermilk together in a spouted jug—the mix will look a bit odd, but trust the process.
- Make the batter blush:
- On low speed, alternate adding the flour mixture and the buttermilk-rosé, starting and ending with flour, swirling in pink coloring until your desired shade glows in the bowl.
- Divide and smooth:
- Spoon the batter evenly into your pans, tap them gently on the counter to knock out air bubbles, and level the tops.
- Bake and cool:
- Let the cakes bake for about 30 minutes, then rest them in their pans for 10 before gently turning out onto a wire rack to finish cooling.
- Whip up the frosting:
- Cream the softened cream cheese and butter until smooth, then beat in the sugar, vanilla, and salt until the frosting is fluffy and swoon-worthy.
- Assemble the layers:
- Stack up the cakes with generous swipes of frosting in between, smoothing the sides and top, then chill for 30 minutes so everything sets up.
- Make the gold drip:
- Melt the white chocolate and cream together till glossy, let it cool slightly, then spoon it around the cake’s top edge so it drips down in stylish ribbons; chill to set.
- Paint on the gold:
- Mix luster dust with a drop or two of vodka or lemon extract to make your paint, and carefully brush it over the set drips for a truly luxe look.
- Final flourishes:
- If you like, crown your creation with edible flowers or gold leaf for extra flair.
 Save to Pinterest
  Save to Pinterest
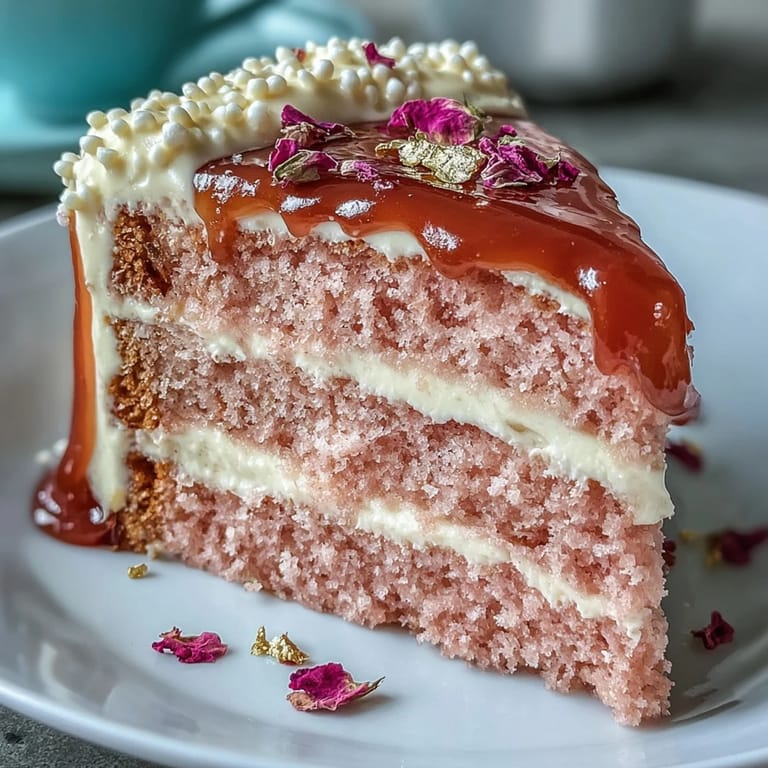
 The first time everyone sliced into this cake and gasped at the glowing pink crumb and shimmery gold drips, I realized how dessert can light up a room—people hovered, phones ready, but after the first creamy bite, the chatter turned to happy silence. That quiet little stretch, surrounded by grins and crumb-dusted plates, is the real reward of sharing a cake like this.
Getting the Perfect Pink Tone
Coloring the batter is a bit like painting—add the gel food coloring a toothpick-tip at a time and blend well after each addition, since the hue deepens as it bakes. Smear a tiny bit of raw batter on a white plate to preview the shade, and remember it's always safer to under-color slightly, unless you really want a bold look.
Frosting Like a Pro
To avoid crumbs sneaking into your cream cheese frosting, start with a thin 'crumb coat'—a light layer of frosting all over—that catches stray bits and seals the cake. Chill this base for 15 minutes, then finish with a thicker layer; an offset spatula is your best friend for smoothing the sides and swirling those fancy patterns up top.
Making and Painting the Gold Drip
Getting the consistency right takes patience—wait until the melted chocolate drip mixture is just warm, not hot, so the drips fall gracefully and stop mid-way down (not all the way to the base). Use a small, soft brush for the gold luster; a little paint goes a long way and dabs up best when the chocolate is fully set.
- Chill the cake again before painting to prevent smudges.
- Keep a damp cloth handy to clean up stray gold dust bits.
- Don’t worry if the drips aren’t all the same—imperfect ones look most charming.
 Save to Pinterest
  Save to Pinterest
 Cakes like this are meant for happy gatherings and a bit of sparkle. Whip it up for the next celebration and watch the whole room glow.
Recipe FAQ
- → Can I omit the alcohol?
Yes. Substitute equal parts pink grape juice or sparkling cider for rosé to retain color and sweetness while keeping the floral-fruity note.
- → How do I get a vibrant pink color?
Use a small amount of concentrated pink gel food coloring and add gradually until you reach the desired hue; avoid too much liquid dye to preserve batter consistency.
- → Why chill the cake before dripping?
Chilling firms the frosting so the white-chocolate ganache sets quickly on contact, creating clean drips rather than running too far down the sides.
- → How can I keep cream cheese frosting stable?
Beat cream cheese and butter until smooth, then add sifted confectioners’ sugar gradually. Chill the frosting briefly if it becomes too soft before spreading and assembling.
- → What's the best way to paint the gold?
Mix edible gold luster dust with a few drops of clear vodka or lemon extract to form a paint, then use a small, dry brush to apply once the white chocolate drip has fully set.
- → How long will the finished cake keep?
Store covered in the refrigerator for up to 3 days. Bring to room temperature before serving to soften the frosting and enhance flavors.